Hardware Product Development Process: Concept to Production
Learn the full hardware product development process, stage by stage from concept and DFM to EVT, DVT, PVT and mass production.
You have a product in your head. Maybe there's a rendering. Maybe there's a 3D print sitting on your desk that a friend has already asked to buy. What you don't have is any idea what happens between that object and a pallet of finished units on a shipping dock.
So you start asking. One firm quotes you for "design." Another quotes for "engineering." A factory in Shenzhen asks for your DFM package and you don't know what that is. Somebody mentions EVT and DVT in a call and you nod. Every answer assumes you already know the shape of the thing you're asking about.
You don't, and nobody has drawn it for you.
This article draws it. It walks the full hardware product development process end to end — every stage, what gets decided in each one, what you hand over at the end of it, and what it costs you when you skip ahead. By the end you'll know which stage your product is actually in, what the next gate is, and which of the six most common mistakes you're currently set up to make.
The Short Answer
The hardware product development process is the sequence of stages that takes a physical product from an initial concept to volume manufacturing. It has seven core stages: discovery and requirements, concept and industrial design, engineering architecture, prototyping, design for manufacturing and design freeze, validation builds (EVT, DVT, PVT), and mass production. Each stage ends in a decision gate where the project continues, changes, or stops. The stages are sequential because each one produces the input the next one needs — you cannot design for a factory you have not chosen.
What Is the Hardware Product Development Process?
The hardware product development process is a staged framework for turning a product idea into manufactured units, in which each stage has defined outputs and ends in a go/no-go decision.
The structure is not a design-industry invention. It comes from new product development (NPD) research. The term "Stage-Gate" was coined by Robert G. Cooper, Professor Emeritus at the DeGroote School of Business at McMaster University, and first appeared in print in 1988. Cooper's model divides development into stages of work separated by gates — checkpoints where a cross-functional team decides whether the project proceeds, and where poor projects are deliberately killed rather than carried forward. His research found that new products fail at a high rate: roughly one in ten new-product concepts succeeds, and around 44% of new-product projects miss their profit objectives.
Regulated industries formalised the same idea with legal force. In the United States, medical device manufacturers must follow design controls under 21 CFR 820.30 — a set of requirements covering design planning, inputs, outputs, review, verification, validation, transfer, changes, and a design history file. The FDA began inspecting manufacturers against design controls in June 1997. Most consumer hardware is not regulated this way. The vocabulary is still worth borrowing, because it is precise where industry chatter is vague.
What makes hardware different from software is not the number of stages. It is that each gate is expensive to walk back through. A software release can be patched on Tuesday. A steel mould cut for the wrong wall thickness is a five-figure decision you live with, and every unit already made carries the mistake.
The Seven Stages of the Hardware Product Development Process
Each stage produces a specific artefact. If you cannot name the artefact, the stage is not finished — regardless of how long you have been in it.

# | Stage | What you decide here | Key output |
|---|---|---|---|
1 | Discovery and requirements | What the product is for, who buys it, what it must do | Product requirements document, target cost |
2 | Concept and industrial design | Form, materials, interaction, how it is understood on a shelf |
Stages 1 to 4 are where the product is decided. Stages 5 to 7 are where it becomes real and cheap to change nothing. Founders routinely spend nine months on stages 2 and 4 and three weeks on stage 5, then wonder why the factory keeps sending change requests.
What Happens in Discovery and Requirements?
Discovery is where you decide what the product is before you decide what it looks like.
The output is a product requirements document that states what the product must do, what it must not do, who it is for, what it will sell for, and what it can cost to make. That last number is the one most teams skip, and it governs everything downstream. Target cost determines material choice, which determines process, which determines tooling, which determines your minimum order quantity, which determines how much capital you need before the first sale.
Requirements should be written as testable statements. "Long battery life" is not a requirement. "Runs for a defined number of days on a single charge under a defined usage profile" is a requirement, because someone can later prove it true or false.
This stage also fixes your regulatory scope, and the scope has cost. A product that transmits over Bluetooth needs radio certification. A mains-powered product needs electrical safety testing. A product that touches skin or food needs material compliance. Deciding these in month one is planning. Discovering them in month ten is a delay.
What Is Design for Manufacturing, and When Does It Start?
Design for manufacturing (DFM) is the practice of designing parts so they can be produced reliably and economically by a specific manufacturing process. Design for assembly (DFA) extends this to how parts go together on a line. Together they are often called DFMA.
DFM starts at the concept stage, not after it. This is the single most consequential sequencing decision in hardware.
The reason is that manufacturing constraints are not adjustments you apply to a finished design. They are properties of the design itself. An injection-moulded part needs draft angles so it can leave the mould, consistent wall thickness so it cools without sinking, and a parting line that has to fall somewhere visible. If nobody decided where that parting line goes, the mould maker will decide for you, and it will land across the face of your product.
The same is true at every level. Sheet metal has minimum bend radii. PCBs have minimum trace widths and annular ring requirements set by your fabricator's capability. Every process has a set of rules, and those rules are the material you design in — not obstacles applied to a design that already exists.
Practically, DFM means your engineering team and your chosen manufacturer are talking before design freeze, not after it. Which brings up the most common sequencing error in early hardware: choosing a manufacturer last. You cannot design for a process until you know whose process it is. Two injection moulders will give you two different sets of constraints, two tolerance capabilities, and two different tooling costs for the same part.
What Are EVT, DVT, and PVT?
EVT, DVT, and PVT are the three validation build phases between a finished design and mass production.
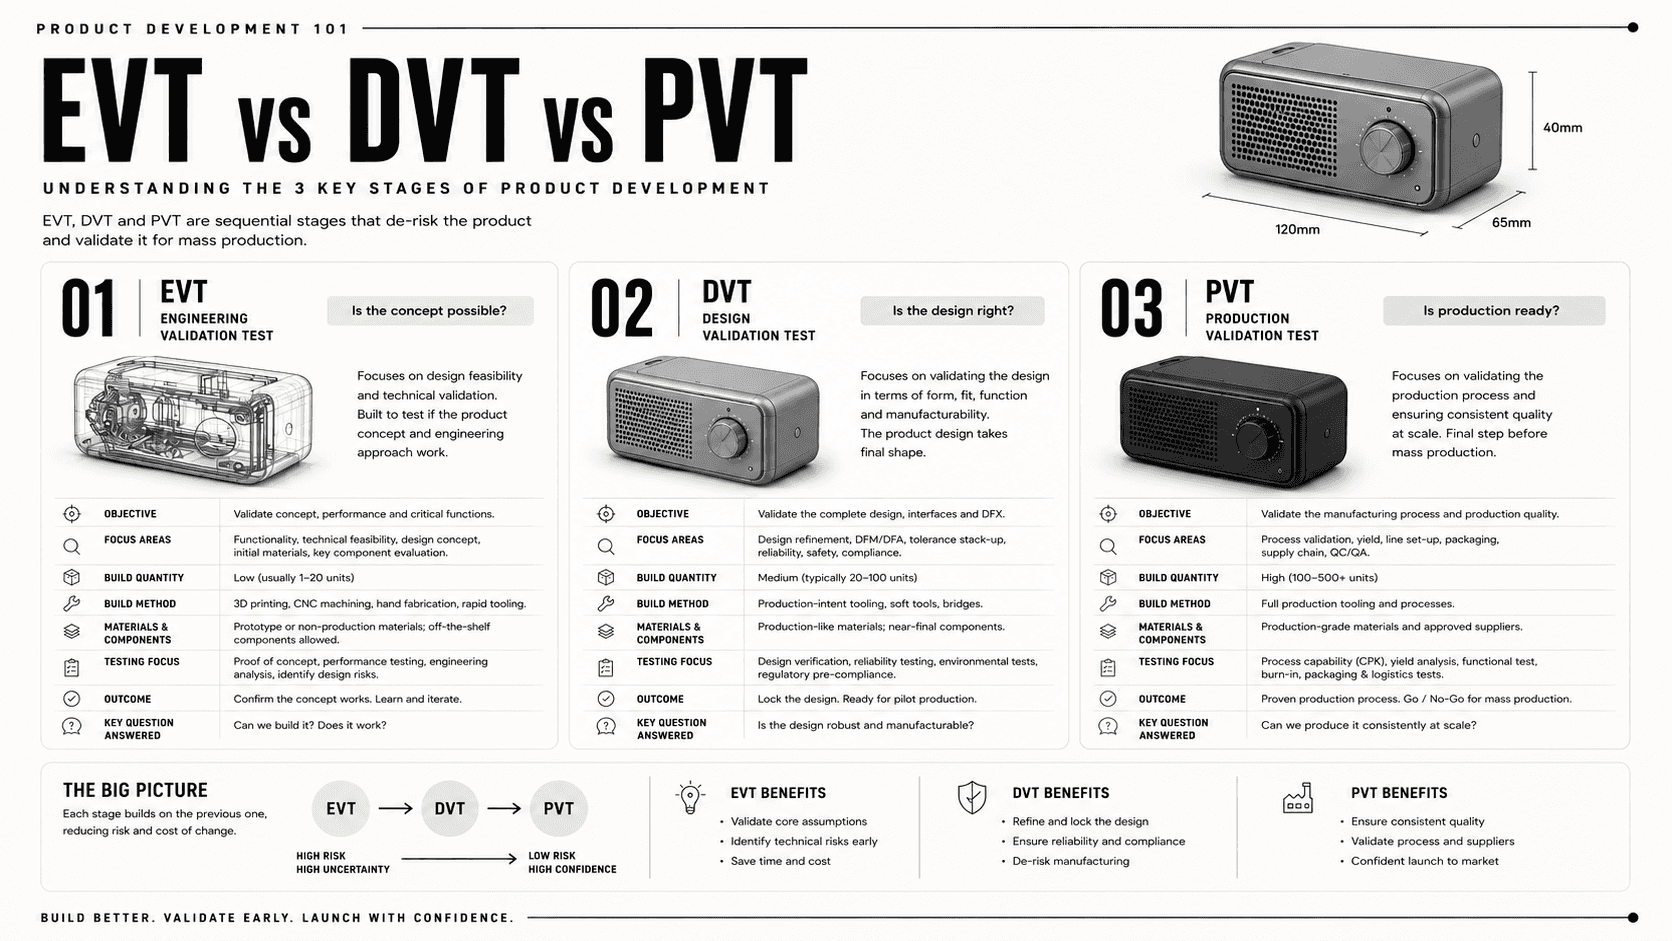
EVT (Engineering Validation Test) is the build that proves the design works. Units are assembled from prototype or soft-tooled parts, often by hand. The question EVT answers is: does the product do what the requirements say it does?
DVT (Design Validation Test) is the build that proves the design works when made the way it will actually be made. Units come from production-intent tooling and production-intent materials. This is where certification testing usually happens, because the sample must represent the shipping product.
PVT (Production Validation Test) is the build that proves the factory can make it. It runs on the real line, with real operators, at something close to real rate. PVT is testing the process, not the product.
The distinction that matters underneath all three is verification versus validation, and the FDA's definitions are the clearest available. Verification confirms that design outputs meet design inputs — you built the thing right. Validation confirms that the product conforms to user needs and intended use — you built the right thing. A product can pass every verification test and fail validation completely, because it does exactly what the specification said and the specification was wrong.
At the end of this sequence you sign off a golden sample: a physical unit, agreed by you and the manufacturer, that defines acceptable appearance and function. Every later production unit is judged against it. Without one, "acceptable finish" is an argument you will have monthly and lose.
What Does Design Transfer Actually Involve?
Design transfer is the handover of a validated design to manufacturing as a complete, unambiguous production package.
It is not a folder of CAD files. A transfer package includes manufacturing-ready 3D models, 2D drawings with dimensions and tolerances called out, a bill of materials (BOM) with approved suppliers and part numbers, assembly instructions, test procedures and pass/fail criteria, packaging specifications, and the golden sample.
The test of a good transfer package is simple: could a competent factory you have never met build this correctly without calling you? Anything they would have to ask about is something you have not specified, and every unspecified detail becomes a decision made by someone whose incentive is speed.
This is also where a design either stays yours or quietly stops being yours. Tooling ownership, test fixture ownership, and firmware source control are all settled in the transfer paperwork. Founders discover they do not own their moulds at exactly the moment they want to change suppliers.
Worked Example: A Connected Consumer Device, Concept to Production
Take a plausible scenario — a battery-powered environmental sensor for the home, with a moulded enclosure, a custom PCB, a rechargeable cell, Bluetooth connectivity, and a companion app. Here is how the stages play out.
Discovery sets the target retail price and works backwards to a landed unit cost. That cost immediately rules out a machined aluminium body and points to moulded polymer. It also establishes that the product transmits, so radio certification is in scope, and that it charges from mains, so the power supply is in scope too.
Concept and industrial design produces the form. The sensor needs airflow, so vents are not decoration — they are a functional requirement that also happens to be the most visible design element. Wall thickness is chosen with moulding in mind.
Engineering architecture allocates volume. The battery, the PCB, the antenna, and the sensor element all compete for space, and the antenna loses if nobody defends it. Antenna placement near a battery or a ground plane degrades range — a mechanical decision with a radio consequence, which is precisely the kind of collision that happens when mechanical and electronics work in separate files.
Prototyping targets the unknowns: does the sensor read accurately inside a closed enclosure with a warm PCB nearby? Does the radio hold a connection through a wall? These are the risky questions. The enclosure snapping together is not a risky question and does not need three prototype rounds.
DFM and design freeze converts the design to the chosen moulder's rules — draft, parting line, ejector pin positions, gate location, boss and rib geometry. Final BOM is locked with approved alternates for the long-lead components. Freeze means freeze.
EVT builds units and tests them against requirements. DVT builds from steel tooling and sends samples for radio and safety certification. PVT runs the line and measures yield.
Mass production starts, and the field data comes back — battery behaviour in real homes, connection drops in real buildings. That data is the beginning of the next revision, and in a connected product it is also the only part of the system a competitor cannot buy a unit and copy.
What Founders Get Wrong About the Hardware Product Development Process
1. Believing the design is done when the CAD looks right. A model that renders beautifully can be unmanufacturable in a dozen ways that are invisible on screen — no draft, uniform-looking walls that are actually variable, tolerances no process can hold. Looking finished and being finished are unrelated states.
2. Choosing a manufacturer after the design is complete. DFM is specific to a supplier's equipment and capability. Designing first and sourcing second guarantees a redesign, and you will pay for it under time pressure.
3. Treating a working prototype as near-final. A 3D-printed prototype proves an idea. It proves almost nothing about the manufactured product, because it is a different material made by a different process with different tolerances. Prototypes de-risk concepts; they do not de-risk production.
4. Budgeting tooling as one line item at the end. Tooling is not a single payment. It is cut, sampled, adjusted, re-sampled, and adjusted again. Design changes after steel is cut are charged as modifications, and some changes cannot be made at all because you cannot add material back to a mould cavity without welding it.
5. Leaving certification until just before launch. Certification tests a physical sample and takes real calendar time. If it fails, the fix is usually a design change, which means new samples and a new test. Products miss launch dates on certification more often than on manufacturing.
6. Skipping the requirements document because the team "knows what we're building." Every unwritten requirement becomes an assumption, and assumptions diverge silently across mechanical, electronics, firmware, and app until they collide in an integration build.
How Long Does the Hardware Product Development Process Take?
There is no honest universal answer, and any specific range you see quoted without qualification is a guess.
The duration of your project is set by a small number of variables, and you can estimate it yourself once you know them:
Number of custom parts requiring hard tooling. Every moulded or cast part is a tooling cycle with its own lead time and its own sampling loop.
Whether electronics are custom or module-based. A certified pre-made module removes both design time and certification scope. A custom radio design adds both.
Certification scope. Radio, electrical safety, materials, and any market-specific marks each carry their own test queue.
Cosmetic requirements. A textured, painted, or multi-material finish adds sampling rounds that a plain matte enclosure does not.
Component lead times. The single longest-lead part in your BOM sets the floor for every build, and that part is usually a semiconductor or a custom battery.
Number of design iterations you are willing to fund. This is the only variable you fully control, and it is the one most often underestimated.
If someone quotes you a timeline without asking about these, they are quoting a template.
Frequently Asked Questions
What is the hardware product development process?
The hardware product development process is the sequence of stages that takes a physical product from concept to volume manufacturing. It typically comprises seven stages: discovery and requirements, concept and industrial design, engineering architecture, prototyping, design for manufacturing and design freeze, validation builds, and mass production. Each stage ends in a decision gate where the project continues, changes direction, or is stopped.
How many stages are in the hardware product development process?
Most frameworks use between five and seven stages. Seven is the useful number for a physical connected product because it separates prototyping from validation builds, and separates DFM from mass production. The exact count matters less than the principle underneath it: each stage produces a defined output that the next stage requires as its input.
What is the difference between a prototype and a production unit?
A prototype is made by a process chosen for speed, usually 3D printing or machining, in a material chosen for availability. A production unit is made by the process that will make every unit, in the final material, using production tooling. They can look identical and behave differently on strength, tolerance, finish, and thermal performance. A working prototype does not predict production yield.
What do EVT, DVT, and PVT stand for?
EVT is Engineering Validation Test, DVT is Design Validation Test, and PVT is Production Validation Test. EVT confirms the design works. DVT confirms it still works when built with production-intent tooling and materials, and is usually when certification samples are produced. PVT confirms the factory line can build it repeatably at rate. Each build has a different question and a different pass criterion.
What is design freeze and why does it matter?
Design freeze is the point at which no further changes are made to the design without a formal change process. It matters because tooling is cut from frozen geometry. Changes made after steel is cut are billed as tool modifications, take calendar time, and in some cases are physically impossible, since material removed from a mould cavity cannot simply be added back.
What is the difference between design verification and design validation?
Verification confirms that design outputs meet design inputs — that the product was built to the specification. Validation confirms the product conforms to user needs and intended use — that the specification was right. These definitions come from the FDA's design control regulation and apply well beyond medical devices. A product can pass verification and fail validation by perfectly meeting a wrong requirement.
When should you start talking to a manufacturer?
Before design freeze, and ideally during concept development. Manufacturing constraints are specific to a supplier's equipment, tolerances, and capabilities, so design for manufacturing cannot be completed in the abstract. Engaging a manufacturer late means redesigning to their constraints under schedule pressure, which is the most expensive time to make design decisions.
Do you need hard tooling for a first production run?
Not always. Low-volume processes such as urethane casting, CNC machining, or soft aluminium tooling can produce small runs without the cost and lead time of hardened steel tooling. The trade-off is per-unit cost and tool life. The break-even point depends on your part geometry and volume, which is why process selection belongs in the engineering stage rather than after it.
What is a bill of materials and when do you need one?
A bill of materials (BOM) is a structured list of every part, component, and material in a product, with quantities, specifications, suppliers, and part numbers. A preliminary BOM appears during engineering architecture as the basis for cost estimation. A final, locked BOM is required at design freeze, because it defines what the factory buys and what your unit cost actually is.
What is the most common reason hardware projects fail?
Sequencing. Most failures are not caused by a technical impossibility but by decisions made in the wrong order — designing before defining requirements, freezing before selecting a manufacturer, or discovering certification scope after the design is fixed. Each of these converts a cheap early decision into an expensive late one, and hardware offers very few opportunities to reverse a decision without cost.
Final Thoughts
The hardware product development process is seven stages: discovery and requirements, concept and industrial design, engineering architecture, prototyping, DFM and design freeze, validation builds, and mass production. Each stage exists because it produces something the next one cannot start without. The stages are not bureaucracy — they are the order in which the questions can actually be answered.
The founders who ship are rarely the ones with the best-looking concept. They are the ones who knew which stage they were in, what the next gate asked, and what they were required to have in hand before they walked through it. If you are not sure which stage your product is in, that is the first thing worth settling — and it is usually a short conversation.
[Talk to us about your product](URL-TBD: contact page) — we take products from concept through production, and the first conversation is about which stage you are actually in.
Read More.
Stay ahead in the digital world with expert insights on branding, design, and marketing.